Pay Rules must be defined in order to use Time Manager.
Earn Codes must be configured prior to configuring Pay Rules. For more information, please refer to the Prerequisites.
A Pay Rule is a set of configurable flags and settings that dictate the behavior of Time Manager. Pay Rules work in combination with the attributes of Work Shift and Work Period. For further details, refer to Work Shifts and Work Periods.
For information on applying Pay Rules, refer to Apply Pay Rules.
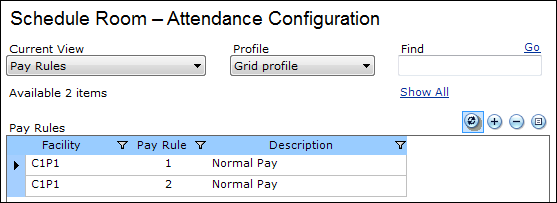
The Pay Rules file room provides a view of all the Pay Rules available by Facility in the system. Pay Rules are user-definable and the grid is personalizable through the DELMIA Apriso personalization framework. For details on personalization, refer to the Portal Implementation Guide.
To view the Pay Rule Properties,
double-click a Pay Rule or select one and click ![]() (Properties).
(Properties).
To add a new Pay Rule:

To delete a Pay Rule, click ![]() (Delete) (you will be
asked for confirmation prior to deleting).
(Delete) (you will be
asked for confirmation prior to deleting).
The entity will not be removed if it is being referenced elsewhere in the application.
The Pay Rule Properties screen enables viewing and modifying the attributes of the entity.
The header of the properties screen contains the following buttons:
The property sheet for Pay Rules is divided into two
sections that can be expanded (with  )
and collapsed (with
)
and collapsed (with  ):
):
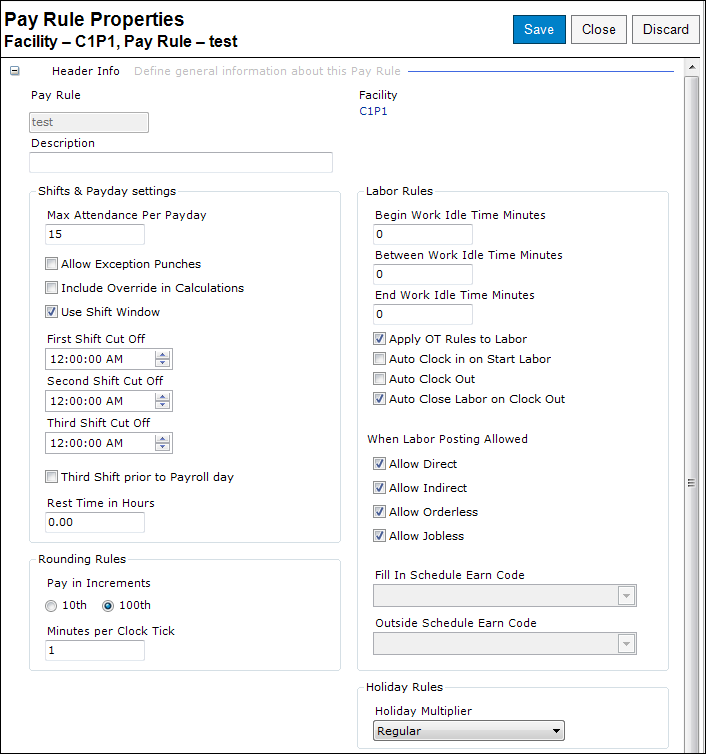
You can define the information in all the sections below for the Pay Rule.
| Attribute | Description |
| Pay Rule | The unique identifier of the Pay Rule. |
| Facility | The Facility for which this Pay Rule is available. |
| Description | The description of the entity. |
| Attribute | Description |
| Max Attendance Per Payday | This setting is used to control when the system determines that one Payday has passed to another Payday. The normal values for this setting are between 16 and 22 hours. This is used as a window beginning from the first Clock In time of a Payday. A Payday will be considered the same for the duration starting from the first Clock In time of the Payday to the first Clock In time of the Payday + Max Attendance per Payday. |
| Allow Exception Punches | Enables clocking out without having clocked in. The Start Time and End Time are set to the time that the clock out occurs. |
| Include Override in Calculations | This flag is used to determine if the override hours entered in the timesheet are included in other calculations for the day or the Pay Period. |
| Use Shift Windows | Determines if the system should use the Work Shift Rounding Rules or Work Period Rounding Rules. If checked, the system will use the Work Shift Rounding Rules. |
| First Shift Cut Off | Designates the hard start of the First Shift. |
| Second Shift Cut Off | Designates the hard start of the Second Shift. |
| Third Shift Cut Off | Designates the hard start of the Third Shift. |
| Third Shift prior to Payroll day | This setting determines to which Payday a Third Shift is linked. For example, the assumed Third Shift Start Time is 11:00 PM, so the computed Payday for this 11:00 PM start can be linked to the current day or the next day. |
| Rest Time in Hours | Used to determine the Pay Day. If the current time is within this setting's hours of an existing closed attendance, then that attendance's Pay Day is used. For example: the First Shift Cut Off is set to 1:00 AM. The Rest Time in Hours is set to 10 hours. The employee has attendance on 3/16 ending at 4:00 PM. The employee clocks in at 1:30 AM (that is, after the First Shift Cut Off) on 3/17. However, since this is within 10 hours of the previously closed attendance, the Pay Day is calculated to be 3/16. The employee clocks in at 3:30 AM on 3/17, which is after the First Shift Cut Off and greater than the rest time hours, so the Pay Day is calculated to be 3/17. |
| Attribute | Description |
| Pay in Increments 10th/100th | Rounds all hour calculations to 10ths or 100ths of an hour. |
| Minutes per Clock Tick | Used to configure how often the clock moves forward. Generally
it is set to one of the following options:
|
| Attribute | Description |
| Begin Work Idle Time Minutes | This is the window between the Clock In and the first Start
Labor. In this example, the assumed Shift Start Time is 7:00, early Clock In is 15 minutes, late Clock In is 5 minutes, and
Begin Work Idle Time is 15 minutes. Any Clock In between 6:45
and 7:05 has an adjusted Start Time of 7:00. Any Start Labor between
6:45 and 7:00 has an adjusted Start Time of 7:00. Only the first
Start Labor between 7:00 and 7:15 has an adjusted Start Time of 7:00.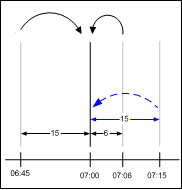 First Work Idle Time (1) The first labor activity might include concurrent starts. Concurrent Start Times are rounded together. In the following example, two concurrent labor records have their Start Times rounded to 7:00. 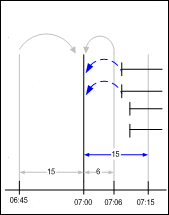 First Work Idle Time (2) If there is a gap in time from when an employee clocks in (attendance start) to when they start working (labor start), and if that gap in minutes is less than or equal to the Begin Work Idle Time Minutes setting, then the labor start is adjusted to the attendance start. |
| Between Work Idle Time Minutes | This is the window between Stop Labor and the next Start Labor.
In the following example, the assumed Between Work Idle Time value
is 10 minutes. Any Start Labor between the preceding Stop Labor
and Stop Labor time + Between Work Idle Time Minutes will round
the previous Stop Time forward to the new Start Time.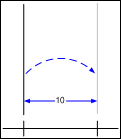 Between Work Idle Time If there is a gap between labor records and if that gap is less than or equal to the Between Work Idle Time Minutes setting, the earlier labor record's End Time is adjusted to the next labor record's Start Time. |
| End Work Idle Time Minutes | This is the window between the last Stop Labor activity and
Clock Out. In the following example, the assumed Shift Stop Time
is 15:30, early Clock Out is 3 minutes, late Clock Out is 20 minutes,
and End Work Idle Time Minutes is set to 15 minutes. Any Clock
Out between 15:27 and 15:50 has an adjusted End Time of 15:30.
Any Stop Labor between 15:15 and 15:45 has an adjusted End Time
of 15:30. 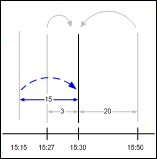 End Work Idle Time If there is a gap in time between the employee ending work and when they clock out, and if that gap in minutes is less than or equal to the End Work Idle Time Minutes setting, the labor end is adjusted to the attendance end. |
| Apply OT Rules to Labor | Used to apply Overtime rules and computations to labor records in addition to attendance records. |
| Auto Clock in on Start Labor | Used to allow the first Start Labor event to perform an automatic Clock In. |
| Auto Clock Out | Used to automatically clock out an employee. The Auto Clock
Out function is scheduled on Clock In to trigger at Clock In time
+ Max Attendance per Payday. The Clock Out time used for the employee’s
attendance records is the latest from this list:
|
| Auto Close Labor on Clock Out | Used to automatically close labor on Clock Out. The end times for the labor records are set to the attendance Clock Out. |
| When Labor Positing Allowed – Allow Direct | Used to determine how to populate the Type column in Time Manager. If Allows Direct is active, the Type column will display all of the values in the WIP_ORDER_TYPE table. If only Allows Direct is set (from the list of the four "Allows" settings), the value will default to the first active WIP_ORDER_TYPE row. |
| When Labor Positing Allowed – Allows Indirect | Used to determine how to populate the Type column in Time Manager. If Allows Indirect is active, the word "Indirect" will appear in the Type column. If only Allows Indirect is set (from the list of the four "Allows" settings), the value will default to "Indirect." |
| When Labor Positing Allowed – Allows Orderless | Used to determine how to populate the Type column in Time Manager. If Allows Orderless is active, the word "Orderless" will appear in the Type column. If only Allows Orderless is set (from the list of the four "Allows" settings), the value will default to "Orderless." |
| When Labor Positing Allowed – Allows Jobless | Used to determine how to populate the Type column in Time Manager. If Allows Jobless is active, the word "Jobless" will appear in the Type column. If only Allows Jobless is set (from the list of the four "Allows" settings), the value will default to "Jobless." |
| Fill In Schedule Earn Code | Fills in the gaps in attendance when the employee clocks in
our out. Both this and the Outside Schedule
Earn Code are required. If an employee clocks in after
their scheduled Start Time or clocks out before their scheduled
End Time, then the system creates an attendance record with this
setting as the Earn Code in order to close the gap when the employee
was scheduled to work.
For example: an employee's schedule is from 7:00
Am to 4:00 PM. The employee clocks in at 8:00 AM and clocks out
at 3:00 PM. The following Earn Codes will appear in the attendance
record that is created:
|
| Outside Schedule Earn Code | Enters attendance when the Clock In or Clock Out occurs outside
of the employee's scheduled Start Time and End Time. If a Clock
In is before the employee's scheduled Start Time, the attendance
record created will have the Earn Code specified in this setting.
When the employee clocks out, additional attendance records will
be created for any time spans outside the employee's schedule.
For example: an employee's schedule is from 7:00
Am to 4:00 PM. The employee clocks in at 6:00 AM and clocks out
at 5:00 PM. The following Earn Codes will appear in the attendance
record that is created:
|
| Attribute | Description |
| Holiday Multiplier | Used when an employee works on a scheduled holiday. Options
for this setting include:
|

To view the Pay Rule Earn Code
Properties, double-click a Pay Rule Earn Code or select one and click
![]() (Properties).
(Properties).
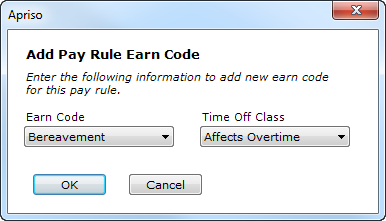
To add a new Pay Rule Earn Code:
To delete a Pay Rule Earn Code, click ![]() (Delete)
(you will be asked for confirmation prior to deleting).
(Delete)
(you will be asked for confirmation prior to deleting).
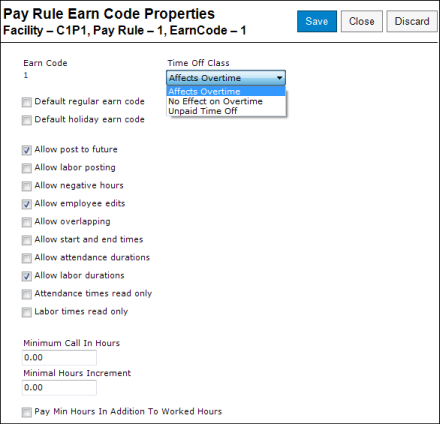
You can define the following information for the Earn Code:
| Attribute | Description |
| Earn Code | The selected Earn Code. |
| Time Off Class | Specifies how this Earn Code affects Overtime. The options
are:
|
| Default regular earn code | When checked, this single Earn Code will be used when an employee
performs a Clock In. It will also be the defaulted Earn Code used
on the insertion of an attendance record in Time Manager.
The system checks that a Pay Rule has a default regular Earn Code. If it does not, the Pay Rule is invalid. |
| Default holiday earn code | When checked, this single Earn Code will be the one for which holiday hours are computed. |
| Allow post to future | Defines if the user should be able to post hours to a future date. Generally, REG would not permit post to future, VAC would allow it, and SICK may allow it. |
| Allow labor posting | Makes it possible to report labor against the Earn Code. Generally REG would allow this while VAC/SICK would not. |
| Allow negative hours | Makes it possible for the Earn Code to accept negative hours. |
| Allow employee edits | Defines if an employee should be able to edit their own information against this Earn Code. Generally REG/SICK would not allow this while VAC may allow it. |
| Allow overlapping | Turns off the validation in Time Manager that attendance entries
cannot have overlapping time spans. If two or more attendance
entries overlap, the Earn Codes for all the attendance entries
must allow overlapping to be valid.
This setting down not affect creating attendance outside of Time Manager (e.g., via the ClockIn Business Component method). |
| Allow start and end times | Defines if the hours against this Earn Code should accept Start and End Times or use durations. All of the Earn Codes that allow Start and End Times compute the durations. These computed durations can be overridden on a row-by-row basis. Generally REG would allow Start and End Times while VAC/SICK would not. |
| Allow attendance durations | This flag allows attendance durations to be entered in the Elapsed Hours column. If this flag is enabled and Allow start and end times is disabled, then Elapsed Hours must be entered. If both this flag and Allow start and end times are enabled, then either Elapsed Hours or a Start Time and an End Time may be entered based on the Calculation Overridden flag setting for the attendance entry. |
| Allow labor durations | This flag overrides the Allow start and end times setting, allowing durations to be entered. It automatically sets the Calculation Overridden flag as true in the Labor Grid, thereby activating the Elapsed Hours column. |
| Attendance times read only | When this flag is set, attendance times are read-only. |
| Labor times ready only | When this flag is set, labor times are read-only. |
| Minimum Call In Hours | The minimum hours that can be posted using durations to this Earn Code. Also used for Call In pay as the minimum hours. |
| Minimal Hours Increment | The minimum hours increment that can be posted using durations against this Earn Code. An Earn Code can accept +/- Minimum Call In Hours +/- Minimum Hours Increment * n, wherein n is an integer greater than or equal to 0. |
| Pay Min Hours In Addition To Worked Hours | When this flag is not set, the duration of an attendance marked as Call In is going to be equivalent at a minimum to Minimum Call In Hours, regardless of the Start Time and End Time. In addition, Time Manager will show an error if the attendance has the Calculation Overridden flag set for the attendance entry and the Elapsed Time is less than the Minimum Call In Hours. If the Start Time and End Time of the attendance makes the duration greater than Minimum Call In Hours, the system will use the actual duration instead. For example: Minimum Call In Hours is 4. Attendance from 7:00 AM to 8:00 AM with Call In enabled means a duration of 4 hours. Attendance from 7:00 AM to 3:00 PM with Call In enabled means a duration of 8 hours. When this flag is set, Minimum Call In Hours is added to the duration of the attendance. For example: Minimum Call In Hours is 4. Attendance from 7:00 AM to 8:00 AM with Call In enabled means a duration of 5 hours. Attendance from 7:00 AM to 3:00 PM with Call In enabled means a duration of 12 hours. |